Starlink Won’t Connect: How to Fix
A reliable internet connection is more than just a convenience—it’s a necessity. For many in remote or underserved areas, Starlink provides high-speed internet access where traditional providers fall short. However, like any technology, Starlink isn’t immune to connectivity issues. If you’re facing the frustrating situation where your Starlink won’t connect, don’t worry—you’re not alone, and solutions are available.
By the end of this article, you’ll be equipped with the knowledge to diagnose and resolve most Starlink connectivity problems, ensuring you can get back online quickly and efficiently.
Different Types of Connectivity Issues with Starlink
Before diving into solutions, it’s crucial to understand the types of connectivity problems you might encounter with your Starlink service. You might face slow internet speed where you are connected but your internet speed is slower than expected. This can be frustrating especially when you are trying to stream videos or download large files.
Sometimes, your internet speed would be okay but you might face frequent disconnections. This makes the internet connection unstable and unreliable. However, sometimes, you might face a complete internet blackout, which is the most severe issue. When this happens, your Starlink system won’t connect to the internet at all, leaving you completely offline.
Each of these problems can have various causes, from environmental factors to hardware issues. Let’s explore each in more detail and learn how to address them.
How to Troubleshoot Starlink Connection Issues
When your Starlink won’t connect, follow these steps systematically to identify and resolve the issue:
1. Check the Starlink App for Errors
Your first port of call should be the Starlink app. It’s designed to provide diagnostic information and can often point you in the right direction.
Common error messages and their meanings:
| Error Message | Meaning | Initial Action |
| “Searching” | Dish is trying to establish a connection | Wait for a few minutes; if persists, check for obstructions |
| “Offline” | No connection to Starlink network | Check power and cables; restart system |
| “Thermal shutdown” | Dish has overheated | Allow to cool; check for proper ventilation |
2. Verify Dish Alignment and Check for Obstructions
Proper alignment and a clear view of the sky are crucial for Starlink’s performance.
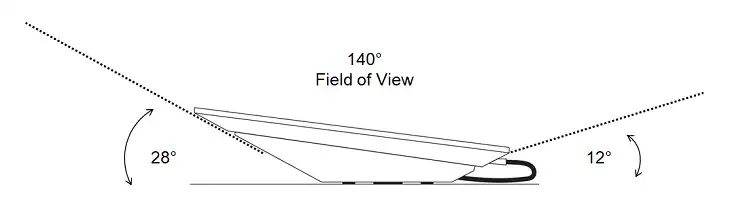
Use the Starlink app’s obstruction viewer to identify potential problems. Common obstructions include:
- Trees
- Buildings
- Mountain ridges
- Even temporary obstructions like heavy snowfall
If you identify obstructions, consider relocating your dish for a clearer view of the sky.
3. Restart Starlink Router and Dish
Often, a simple restart can resolve connectivity issues. Here’s how to do it properly:
- Unplug the power cable from your Starlink router.
- Wait for at least 20 seconds.
- Plug the power cable back in.
- Wait for the system to fully reboot (this can take up to 20 minutes).
4. Check for and Install Software Updates
Keeping your Starlink system updated is crucial for optimal performance.
- Open the Starlink app.
- Go to Settings > General.
- Check for available updates.
- If an update is available, install it and wait for the system to reboot.
5. Power Cycle Modem and Router
If a restart doesn’t work, try a power cycle:
- Unplug both the Starlink router and dish from their power sources.
- Wait for at least 30 seconds.
- Plug in the dish first, then wait for it to fully boot up (about 5 minutes).
- Plug in the router and wait for it to establish a connection.
6. Test Different Devices
If the issue persists, try connecting with different devices to isolate the problem:
- Connect a laptop via Ethernet cable to rule out Wi-Fi issues.
- Try multiple devices to determine if the problem is device-specific.
- Check device settings, especially network and VPN configurations.
7. Advanced Troubleshooting with Debug Data
For persistent issues, diving into debug data can provide valuable insights:
- In the Starlink app, go to Advanced > Debug Data.
- Look for entries related to signal strength, obstructions, or hardware errors.
- Use this information to guide further troubleshooting or when contacting support.
What Affects Starlink Connection
Understanding what can impact your Starlink connection is key to maintaining a stable internet experience:
Weather Conditions
Starlink is generally resilient to weather, but extreme conditions can affect performance:
| Weather Condition | Potential Impact | Mitigation |
| Heavy Rain | Signal attenuation | Wait it out; connection usually recovers quickly |
| Snow | Physical obstruction | Use dish heating feature; clear snow if safe |
| High Winds | Dish movement | Use “Stow” feature in extreme conditions |
Geographic Location
Your location can influence Starlink’s performance:
- Higher latitudes may experience better coverage due to satellite orbits.
- Areas with limited satellite coverage may have intermittent service.
- Starlink continually launches more satellites to improve global coverage.
Network Congestion
Like all internet services, Starlink can experience congestion during peak usage times:
- Typically evenings in residential areas.
- Consider scheduling large downloads or uploads during off-peak hours.
- Starlink is continuously working to increase capacity and reduce congestion.
Bottom Line
While Starlink has revolutionized internet access for many, connectivity issues can still occur. By understanding the common problems, following systematic troubleshooting steps, and knowing when to seek professional help, you can minimize downtime and maximize your Starlink experience.
Remember, Starlink is continually evolving, with regular improvements to both hardware and software. Stay informed about updates and new features to ensure you’re getting the best possible performance from your system.