How to Connect Anova to WiFi? Complete Guide
Connecting your Anova Precision Oven to WiFi is a game-changer for modern cooking. Imagine being able to control your oven from your smartphone or tablet, no matter where you are. You can monitor cooking progress, adjust temperatures, and even start or stop the cooking process with just a few taps.
But the real magic happens when your Anova is connected to the internet. With access to thousands of recipes and cooking guides, you’ll never run out of ideas or inspiration. Plus, regular software updates ensure your oven stays up-to-date with the latest features and improvements. So, if you’re ready to take your culinary skills to new heights, let’s get into how to connect your Anova to WiFi.
Things to Know for Using Annova to WiFi
Before we start connecting your Anova oven to WiFi, there are a few essential things you should keep in mind:
- Wifi Frequency: The Anova oven can only connect to a 2.4 GHz WiFi network. If your router is set up for both 2.4 GHz and 5 GHz frequencies, make sure you connect to the 2.4 GHz network.
- Device Compatibility: For iOS users, your iPhone or iPad must be running iOS 11 or later. Android users need to have a device with Android 8.1 or a newer version.
- Power Source: Ensure your Anova oven is plugged into a wall power outlet and turned on. This may seem like an obvious step, but it’s crucial for the connection process to work seamlessly.
Step-by-Step Guide: Connecting Your Anova to WiFi
Now that you have the necessary prerequisites, let’s dive into the step-by-step process of connecting your Anova oven to your WiFi network.
For iOS
- Download and Launch the Anova App: Head over to the App Store and download the Anova Culinary app. Once it’s installed, open it up and get ready to connect your Anova.
- Connect to 2.4 GHz Wifi: Make sure your phone or tablet is connected to your home’s 2.4 GHz wifi network. If you’re not sure which network to choose, check your router settings or consult your internet service provider.
- Power Up Your Anova: Plug your Anova Precision Cooker into a wall outlet and switch it on.
- Access the Connection Menu: Within the Anova app, navigate to the More tab and tap on “Connect My Oven” (Note: Wording may vary slightly depending on your specific Anova model).
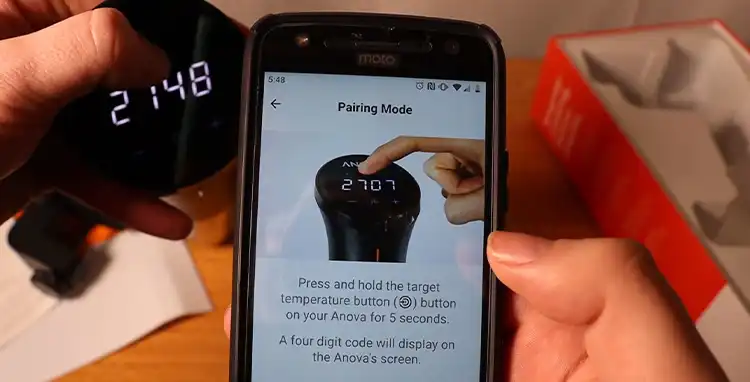
- Enter Pairing Mode: Locate the wifi button on your Anova and press and hold it for five seconds. This will put your Anova into pairing mode, and a four-digit code will appear on the display.
- Connect in the App: The Anova app should automatically detect your Anova in pairing mode. Enter the four-digit code displayed on your Anova into the app, and follow the on-screen instructions to complete the wifi connection process.
That’s it! Your Anova oven should now be connected to your WiFi network, and you can start exploring the app’s features and enjoy the convenience of remote monitoring and control.
For Android
The steps for connecting your Anova to wifi on an Android device are very similar to those for iOS:
- Download and Launch the App: Just like with iOS, download and install the Anova Culinary app from the Google Play Store. Once installed, open the app and prepare to connect.
- Connect to 2.4 GHz Wifi: Ensure your Android phone or tablet is connected to your 2.4 GHz wifi network. Double-check your network settings if you’re unsure.
- Power Up Your Anova: Plug your Anova Precision Cooker into a wall outlet and turn it on.
- Access the Connection Menu: Open the Anova app and navigate to the “More” tab. Tap on “Connect My Oven” to initiate the wifi connection process.
- Enter Pairing Mode: Locate the wifi button on your Anova and press and hold it for five seconds. This will activate pairing mode, and a four-digit code will be displayed on the screen.
- Connect in the App: The Anova app should detect your Anova in pairing mode. Enter the four-digit code displayed on your Anova into the app, and follow the on-screen prompts to finalize the wifi connection.
Once the connection is established, you can start exploring the app’s features and take advantage of the remote control capabilities.
Wrapping Up
Connecting your Anova Precision Cooker to wifi opens up a world of possibilities for sous vide cooking. By following the steps outlined above, you’ll be well on your way to unlocking the full potential of your Anova and achieving restaurant-quality results at home. Remember, if you encounter any difficulties during the connection process, don’t hesitate to consult the Anova app’s user manual, online resources, or reach out to Anova’s customer support team. Happy sous viding!